Monday, August 20, 2012

Spray Paint Remover

In my infinite brilliance, I decided to do some spray painting.  Maybe I'll even post pics when I'm done.  If my track record is any indicator, then it's pretty clear I won't.

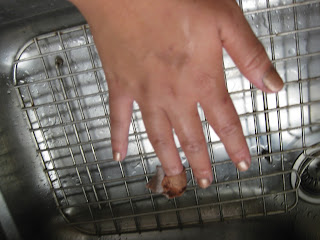
Anyway.... like I was saying, I did some spray painting.  For some reason it made sense in my mind to hold the stuff in my hand while spray painting.  I know, I'm brilliant.  By the time I finished, I had a pretty freaky looking hand.


At this point I came inside and tried scrubbing at it with hand soap.  Nothing.  Couldn't even turn the soap faintly gray.  Then I tried the dish soap.  Still nothing.  I used my tried and true scrubbing toothbrush and still nothing.

Now I was starting to get concerned.  I have no problem having a few paint spots on me but having my whole hand pretty much black would get some pretty odd looks.  Because people don't think I'm strange enough as it is.

That's when I started searching the internets.  It did not look good.  Because of the fine mist of spray paint it's really hard to clean off.  And the oh so helpful tip of cover yourself before you spray paint.  Because that really helps with my alien black hand.

Fortunately someone mentioned that most spray paints are oil based so an oil based cleaner may work.  How have I managed to ramble this long without getting to the point?

So here's my trick.  Sugar scrub. 


Rub it into your hands until the paint loosens up.  The oil of the sugar scrub will help dissolve the paint and the grits of the scrub help get everything moving. 


After all the paint is dissolved into the scrub, use soap to actually wash away the oily painty residue.


Here's a bonus tip: don't stick your hands in a hot skillet.  It's just stupid.  Yes, that explains the bandaid in the pictures

Sunday, April 1, 2012

Knife Drawer

OK so we all know I suck at blogging.  So there's no before picture.  And my after picture isn't great.  But you get the idea.  For the before, picture a drawer with knives randomly thrown in there, fearing getting dinged and/or a finger getting cut.  It always bothered me to put my fancy expensive Wustof knife in the drawer so it usually sat on the counter on my cutting board.

I'd been thinking about getting a slab of wood and cutting grooves in it for the knives so that they would stand vertically, ie a custom homemade drawer knife block.  But obviously that would require effort and like so many other things, I hadn't gotten around to doing it.

I saw this and realized what I needed to do. This is a much simpler solution and can adjust to whatever knives are in the drawer at the time.  No figuring out which one goes where.  No figuring out how to get all these cuts into a piece of wood.

Krista used cork but I had a stack of foam sheets that has been steadily growing with no particular use in mind.  I cut them into lots of about 8"x3" sheets.  Stacked them up, stuck them in the drawer and stuck the knives in.  It took all of 15 minutes to do.  And really that's just because I cut them to the wrong size the first time and had to recut them.  You want the length to be the length of the blade of your longest knife.  There is a small section of the knife where the blade meets the handle that tends not to want to go into the foam.

I could actually see this being done with cardboard and looking pretty cool.  You would probably get the sizes more consistent with cardboard.  Or if you are less spazzy than me.  We'll call it 'artisan'.  Cue the hate mail from people who actually do artisan crafts that don't look like a 5 year old made it.  But hey, at least my knife drawer is finally getting some order.


Tuesday, March 27, 2012

Making a Mess

My neighbors love me.  Ha.  Hopefully I won't make a big enough mess for someone to actually complain.

So I've decided to make a mess of my yard.  The previous owners had it all nicely landscaped and pretty.  Well, since I bought it, I didn't water the lawn so I let the grass die and the weeds take over.

I never really cared for that planting strip at the front.  What purpose does it serve? So I decided to plant some tulips last fall.  Directly into the grass because I didn't feel like figuring out how to get rid of the grass.  

Well, then spring came along and the tulips started coming up.... and I realized I needed to do something.  So I laid mulch.  To kill the grass, I put newspaper down under the mulch to help suffocate the grass.  

So far this hasn't worked out so well.  First, I didn't buy enough mulch and so I ran out and the newspaper was peeking out from under it.  At the time I didn't think it was that hideous but the next day, as I was leaving or work, I realized how absolutely horrendous it was.  So that night I went and bought more mulch and laid that down.

Well, now it's been a few weeks.  The grass is peeking out at the edges.  And in places where the paper has shifted, leaving a gap for the grass to come through.  And next to the plants.

I also decided to cut some babies off a spikey plant closer to the house and plant those.  No clue what it is other than a spikey plant.  I transplanted 4 of them and it looks like 2 of them should survive.  I'll probably try another 2 or so again.  The original plants are pretty big and over grown and haven't appeared to have been harmed by my earlier attempt so I have more material to play with.


If you take the picture at the right place and angle, it doesn't look too bad.  Look! I have flowers.  What's that thing next to the flower?  It must be some glare or something.  It couldn't be newspaper peeking out.  Why would there be newspaper there?  hah


The garden center is not a good place for me.  It's a really nice garden center and they have tons of cool stuff.  It's really hard for me not to spend an hour just browsing what they have.  It's also really hard not to walk out of there with way more than I have any reason to buy. 

Case and point, the tree I bought.  It's a persimmon tree.  The reason this is relatively good is because it's only one tree, where I had 3 others I was also seriously considering.


So far it's just a stick in some mulch.  Hopefully something will happen soon.  I have no idea what I'm doing or when some signs of life will show up.

Saturday, March 24, 2012

New Table

So my hoarder tendencies are going strong.  With the warm spring weather, everyone seems to be cleaning out and I have picked up a ton of furniture at the curb.  My garage is now packed with furniture.  A dresser, shelves, platform bed.....

Here is one piece. When I brought it home, I was figuring would be a really nice table for garden planning in my seed growing room and I can use one of the random chairs that I hoarded with it.


Well, only when I reassembled it, did I realize it's only about 1.5 feet tall.  Yes, I realize when the legs are just over a foot, it's not exactly going to be a standard table height but for some reason I didn't realize that until I assembled it and stood it up.

So now the question is, what is this table supposed to be for and what the hell am I going to do with it?

Friday, February 17, 2012

Seed Starting Update

I have my first sprouts!

See em?
They are in there
Broccoli and Brussels Sprouts have sprouted

Yes I do realize it's really early to be starting them but the weather's been so warm, I figure spring's gonna start early and they like a little bit of frost right?  That and I'm excited to have my first garden.  Garden that I own, that is.  Well, I guess technically the bank owns it.  hrm.  I'm good at sucking the joy out of things.

These were new seeds.  Most of my seeds are from 2010 and none of them have sprouted yet.  I'm hoping it's just because these ones sprout fast and the other ones will come up in the next week or so.  Otherwise I will be sad.

Monday, February 13, 2012

Seed Starting

 
The first batch of seeds has been started!  That is my water heater.  It's the warmest place in the house.  Until the plants actually sprout, they need heat, not light.  Once they have sprouted, they will move to a shelf where I will set up flourescent lights to get some seedlings going.  

I am anticipating 8 weeks to transplant.  Last frost date here is listed as April 11-18.  Hopefully it will be earlier rather than later.  Most of the seeds are from 2010 so we'll see how they do.

The seeds are a bunch of herbs, a bunch of tomatoes, a bunch of peppers and a bunch of other stuff, don't remember what other seeds I randomly chose.   Very descriptive, I know.

Thursday, February 9, 2012

Hey look!  It's another post!  This is no way guarantees future performance.  Apparently I've heard too many investment commercials.

So I guess I should provide some other updates as well.

Well.

So what do I have to update.

The year started out with a bang.  A bunch of changes going on in my life.  Really stressful start to the year at work.  A few weeks in, I was really disturbingly close to having a complete psychotic meltdown.  Some may say I wasn't just close, but I was way over that line.  Of course some would say I've never seen the right side of it.  But I'm better now.  Relatively speaking anyway.  I never claimed to be the picture of normal.

Anyway....

I am preparing to start seeds for spring.  That's all sorts of exciting.  Except that I am so indecisive  that I keep changing what I want to grow, where each plant goes, how I want to lay out the garden, etc.  You would think, considering I now have probably double the space I have had before, I would have plenty of space for everything.  But I keep adding more stuff I want to grow!  Well (theorhetically anyway) I will have more posts in the future about that.

Now... I will actually publish this without a picture because it'll never get posted if I wait until I dig up my camera, take the pictures, copy the pictures over, choose one, post it... Yes I realize in the amount of time I spent typing that out I could've done all that.

This is a pretty simple recipe.  A good way to get a nice sugar kick going.  Maybe a way to kick off my return to blogging.


Chocolate Peanut Butter Fudge
based off Alton Brown's fudge recipe.  Google it if you want that instead of my version.

1 cup crunchy peanut butter
8 oz butter
1 lb confectioners sugar
1 tsp vanilla extract
1/2 cup chocolate chips

Coat an 8x8 pan with cooking spray or butter.  Heat peanut butter and butter in a pyrex bowl, covered, for 2 minutes in the microwave.  Stir.  Heat for another 2 minutes in the microwave.  Stir thoroughly.  Stir in confectioners sugar and vanilla until combined and mixture has a dull finish.  Stir in chocolate chips and let sit for a minute to allow them to soften.  Press mixture into the greased pan.  Chill until firm.  Cut into squares.