I made another batch of cookies. I started with this recipe, though obviously there were some adjustments made. I ran out of vanilla the other day. Though actually I just realized I have another bottle. Oh well, the dough is already in the freezer for later.
I had a few limes that I bought as an impulse purchase because everywhere else I looked the limes were like $1 a piece and this was actually reasonable, I forget what. Then they sat in my produce drawer, making them less of a savings. But I used one tonight! The outside wasn't looking so good because it had been sitting in my produce drawer for a few weeks. I had some lemon zest in the freezer so I decided to use that, making them Citrus Meltaways rather than Lime Meltaways.
These posts might be more interesting if I had actually made them and tasted them but the dough tasted good! Quite bright and citrus-y. Hopefully it will keep its acidity after it bakes.
1 1/2 sticks butter, room temperature
1/3 cup powdered sugar
1 tbsp lemon zest
2 tbsp lime juice
1 3/4 cup all purpose flour
a pinch of salt
2/3 cup powdered sugar
Cream the butter and 1/3 cup powdered sugar until light and fluffy.
Add zest and juice and cream until well combined and light.
Mix in flour and salt.
Roll into a 1.5" diameter log and chill for at least 1 hour.
Slice into 1/8" rounds.
Bake at 350 for about 15 mins or until just barely brown.
Place the remaining powdered sugar in a bowl. When the cookies come out of the oven, toss them in the powdered sugar so that it sticks all over the cookies.
Wednesday, December 31, 2008
Sunday, December 28, 2008
Daring Bakers: French Yule Log
This is a pretty intense recipe. I didn't even know what a yule log was, let along a French yule log. There are all sorts of layers and stuff. But it didn't actually take all that long. And a fair amount of it was just put it in the freezer and wait. And I could leave it in the freezer for after all the Christmas nonsense is over.
Now apparently someone caught that the cream was supposed to be whipped in the mousse. But I had printed my recipe earlier. And although I had looked at a lot of comments, I hadn't actually looked at the first page with the recipe corrections. When I was mixing in the cream I thought it was kinda strange but I figured oh well. After I mixed in the last bit of cream I looked at the recipe and saw the correction. Oh well. Still tasted good. Though it probably would have been lighter and fluffier if it had been whipped.
There are a lot of parts to this dessert. There are a whole bunch of layers in there that each need to be made and baked and cooled. They are all small thin layers which means to prep them you need lots of small pot, pans and bowls. I don't have a pot small enough for quite a few of the items. I ended up doing quite a few in a measuring cup and some in the microwave when things needed to be heated/melted.
From the top, it's glaze, mousse, creme brulee, mousse, crisp, mousse, ganache, cake.
The crisp layer didn't work out for me very well. I had issues getting it spread because my pan is slightly warped. Then I left it in the oven too long and the edges burnt. And the creme brulee layer ended up a bit icy as it is a frozen dessert.
The mousse was really rich and good. I will probably make it again, just as mousse, not sure about the whole thing. It was pretty easy too. The ganache and cake are pretty good too though the best part is really the mousse.
Look, I even got a not awful looking (for me) picture! mmmmm

Picture this said by one of those fast talking end of a commercial guys:
"This month's challenge is brought to us by the adventurous Hilda from Saffron and Blueberry and Marion from Il en Faut Peu Pour Etre Heureux. They have chosen a French Yule Log by Flore from Florilege Gourmand."
Thursday, December 25, 2008
Barefoot Bloggers: Pappa Al Pomodoro
This recipe was chosen by Natalie. Now when I saw the name I didn't even know what it was. Pappa Al Pomidoro. How am I supposed to know what that is? I had to look at the recipe a few times before I even pieced it together. It's a soup (mine came out closer to a stew) with bread in it and croutons.
Mistake #1 was starting this when I was hungry. So I started chopping stuff and then I started rummaging around looking for something I could eat right away. Then I'd do another step and go looking for more food. Miraculously I didn't burn anything (including myself)
So this is how I started. I chopped up the veggies that were in the recipe (sorta). I bought a kinda big bulb of fennel so it was probably more than the recipe, plus I had all the fronds and it was throw them in or throw them out... you can see what I did. I just used up the carrots I had, it may or may not be as much as it asked for and when I went to chop the onions (it called for 2) I realized I only had 1 good one. The other one wasn't looking so good. But here are the veggies in the pot.... on top of this there is so much stuff that is supposed to go in, I probably should have used a different pot.

When I went to the grocery store I knew I needed bread and fennel. Forgot to look at what type of bread so I got a baguette. When I got home I realize it called for ciabatta but oh well. It said to put some of it in the soup, like in with the veggies and in there while it simmers. I don't really understand what was supposed to happen with the bread... mine just turned mushy but didn't break down enough to thicken the soup. But the croutons were good. I used maple bacon instead of pancetta, which is slightly weird though not bad. And I toasted them up on the stove rather than in the oven.
Oh and I left out the wine and used a lot less tomato and stock then called for, probably why it came out so stew like.
So this is my super anise-y stew with maple bacon croutons. It's not bad, though definitely way too much fennel. I'll definitely use this approach to making toast, croutons or any other bread product in the future. If I make the soup again I think I'll leave the bread out and just make extra croutons.

Saturday, December 20, 2008
Gift Giving
"The foundation of gift giving is reciprocity. You haven't given me a gift, you've given me an obligation."
"The essence of the custom is that I now have to go out and purchase for you a gift of commensurate value and representing the same perceived level of friendship as that represented by the gift you've given me. It's no wonder suicide rates skyrocket this time of year."
"The essence of the custom is that I now have to go out and purchase for you a gift of commensurate value and representing the same perceived level of friendship as that represented by the gift you've given me. It's no wonder suicide rates skyrocket this time of year."
Thursday, December 18, 2008
Shrimp Fried Rice
So I don't really know why this is but I seem to constantly be trying to use up stuff in my fridge. It doesn't really make sense because there should be some stage of filling the fridge so that I have something to empty. But I don't seem to have that phase. Possibly because I tend to buy groceries on impulse so then it goes into the fridge and becomes something to use up.
This weekend I bought a lobster because I was reading all over the place what a good deal lobster was right now and that it wouldn't last. Now it is in the freezer. I don't know what I am going to do with it since I've never cooked a lobster before.
Anyway, back to this post..... I needed to make something else to cover lunches for the week and I'd thawed out some shrimp. Though I didn't feel like making more pasta this time. I was kinda craving something asian-ish. I thought about beef with broccoli but then I had thawed the shrimp. I know, I'm brilliant.
So this is what I ended up with. It took a while because I chopped the veggies ridiculously small. Like 1/32 of an inch small. And I don't exactly have the best knife skills. But I didn't cut myself, which is totally an accomplishment. It was largely a 'hey look, I have x' type dish. Though the one thing I bought for it was bean sprouts, which I forgot to add. Now I'll have to think of something else to use the bean sprouts in before they go bad.
Fried Rice
1 large onion, finely chopped
1/2 cup carrots, finely chopped
1 rib celery, finely chopped
roast pork, finely chopped
3 cloves of garlic, finely chopped
2 cups raw shrimp, chopped
a few cups leftover white rice
2 eggs
soy sauce
rice wine vinegar
oyster sauce
vegetable oil
Chop everything before you start.
Heat up a large skillet on high heat. I suppose you could use a wok but, well, I didn't.
Add some oil to the pan and cook the shrimp, just until they turn barely pink.
Remove shrimp from the pan and set aside in a bowl.
Add the roast pork and toss until it is warmed through and releases some of its fat.
Add the pork to the shrimp.
Add the onions, celery and carrots to the pan. Add oil as needed.
Saute for a minute until everything softens.
Add the garlic and cook for about 30 seconds.
Add rice, pork and shrimp and stir to combine.
Allow to sit for a few seconds to let the bottom get crisp.
Pour eggs over the top and stir.
Saute until the eggs get cooked through.
Pour soy sauce, rice wine vinegar and oyster sauce over the rice and combine.
Taste and determine if you need anything else.
Tuesday, December 16, 2008
Mushroom and Onion Bread Pudding
I had some seriously stale bread sitting around. This bread to be specific. So I was trying to think of what to do with it. So I ended up on the route to bread pudding. But I didn't want a regular bread pudding because A, been there done that and it wasn't that great and I haven't really found a really good recipe and B, my moratorium on baked goods until after Christmas.
So I decided to do a savory bread pudding. Also a great way to use up stuff in the fridge. Impressively, this actually came out better than my attempts at a normal bread pudding. Rich and creamy with a bit of a crust on the edges. I just used up the bread I had, the rest of a just past the expiration date carton of milk, mushrooms that were in the fridge that were getting close, a hunk of Asiago I bought a while ago because Asiago is wonderful but didn't have anything in mind for what I was going to do with it and a few other things.

Mushroom and Onion Bread Pudding
A bunch of stale bread, torn or cut into small chunks, enough to fill a 8x10 baking pan or whatever you decide to use
2 cups of milk, I am guessing, I just poured the rest of the carton in and figured that was good
5 eggs, lightly beaten
8 oz mushrooms, sliced
1 large onion, chopped
3 cloves garlic, minced
6 oz Asiago cheese, grated
splash of hot sauce
Saute the mushrooms in some olive oil. When they are browned remove them from the pan.
In the same pan, sweat the onions on low with a generous pinch of salt and oil until just starting to brown.
Add the garlic and cook for about 1 minute.
Add the mushrooms and bread and toss to combine while the pan cools.
Whisk together the eggs and milk in a medium bowl.
Add about 1 tsp of salt, grind in some pepper and add the hot sauce. Mix to combine.
Mix in the bread mixture. Allow to sit for several minutes to allow the moisture to soak into the bread.
Mix in the cheese, saving some for the top.
Coat your baking pan with non stick cooking spray
Transfer the mixture into the baking pan.
Sprinkle with the reserved cheese.
Bake at 350 for 45 mins.
Allow to cool and set for at least 15 mins before serving.
Saturday, December 13, 2008
Holiday Spirit
I hate Christmas. I hate the stupid people standing outside every store trying to get your money. I hate the stupid Christmas music that stupid stores feel the need to play. I hate all the crowds out there buying stupid gifts getting in my way of just regular everyday life. And people who claim to be all holiday spirit-y and then they kill someone trying to get some stupid toy or a deal on that TV. This is what they call Christmas spirit? This is what how people show their love and goodwill to others and peace and all that other crap?
I hate people going to church, though this hatred isn't as strong now since at least I don't live across the street from a church any more. From my experience the strongly religious, in particular Catholics as that was the church I lived by, are the most rude, inconsiderate people. I am still bitter about living there. All the church people parking illegally, blocking driveways, blocking streets, hitting cars and not even stopping to assess damage, parking in multiple parking spots that had clearly been shoveled out by hand.... I could keep going and going, like the energizer bunny but I think you get the idea.
Now I realize this is not necessarily a function of the holidays. It's more a function of human nature and pretty much that people suck but the holidays seem to augment this. It brings out everything bad about people. And there are plenty of bad things. Well, maybe not everything but enough for me to hate this time of year.
So here comes my dilemma.
I want to make cookies. But I am strongly opposed to making anything that might be associated with holiday cheer and all that garbage. The fact that I did the Daring Bakers challenge (to be posted later this month) was bad enough. But don't worry, mine doesn't resemble what it was supposed to look like.
So this is what I've decided to do. I made the cookies. Well, at least the dough. Now the dough is one more thing in my freezer. I'll bake them when all this ridiculousness is over and I can go back to baking. My goal is to not do any baking until after all this crap. Unless I think of something that cannot be twisted into some sort of holiday cheer type thing.
So this is what I decided on. I still have candy left from Halloween. I know, most people finished theirs a month or more ago but I still have some there because I was figuring I'd use it for some sort of baked goods and then haven't quite gotten to it yet. Well now I have. I made a chocolate cookie dough, broke up the candy and mixed it in. I had Butterfingers a whole bunch of Butterfingers. Enough to fill up a bowl so I decided that was all I was going to use in this batch. I also had Baby Ruth's and Crunch bars and a few other things but that's all I used.
I had a little trouble initially because my heat wasn't working that day and it was cold. So when I went to cream the butter it didn't work extremely well. I left it on the counter for 24 hours thinking it wasn't under 55 in my house so it'd soften but it still wasn't as soft as usual. Oh well. I proceeded like it was soft and just let the mixer beat it a bit more.
I made them into cookie size balls so when I'm ready to make them I just have to plop them on a cookie sheet and they are good to go. I was lazy and didn't feel like going upstairs to get my computer to choose a recipe and figured I'd just fudge it.
2 sticks unsalted butter, room temperature
1/2 cup granulated sugar
2/3 cup brown sugar
1 tsp vanilla
2 eggs
2 1/4 cup AP flour
1 tsp baking soda
1 1/2 tsp salt
2/3 cup cocoa powder
a whole bunch of fun size Butterfingers, crushed
Cream the butter and sugars together. Add the vanilla followed by the eggs, one at a time, mixing until combined between additions. Scrape down the bowl and mix again to make sure it's uniform.
Sift together the flour, baking soda, salt and cocoa powder. Add to the wet and mix until uniform. Scrape down the sides and make sure it's actually uniform. Mix in the Butterfingers.
Scoop into cookie size balls. Chill the balls for at least 2 hours. Bake at 350. Or don't. Timing will depend on how big you made the cookies, like all cookies.
Thursday, December 11, 2008
Barefoot Bloggers: Coq Au Vin
The first recipe for this month's Barefoot Bloggers is Coq Au Vin. It was chosen by Bethany. This recipe was an interesting choice because I've never actually cooked a whole chicken. Usually I buy cut up parts. Whether it's breasts, thighs, drumsticks, usually I only get one cut.
Well I bought a whole one cut up. I'd never really looked for a whole chicken before so I thought they would come whole and you have to cut them up. It was a whole lot easier that it was already broken down.
Another concern with this recipe was the wine. I don't drink. So I was a little unsure as to what to use. I was at the store when I called K (notice the Gossip Girl reference that totally amuses me) to tell me what to buy. I bought a Merlot. I'd have to dig through the trash to see what brand but I don't really care.
I didn't bother with the oil for the bacon... I never use oil for bacon, once the pan gets hot the bacon releases so much fat it seem like a waste of effort. I only used 4 strips of bacon. And I went to 3 different stores is search of frozen pearl onions before I gave up and decided to go home. The sliced onions will have to do.
My pic looks quite unappetizing and I couldn't decide what the appropriate utensil was so I stuck one of everything in the bowl. Oh and I made some roasted brussel sprouts that are underneath. But it was a decent meal. I maybe over cooked it because the meat was practically falling off the bone but it was good and I like it like that.

Coq Au Vin
4 strips of bacon, cut into small pieces
1 chicken, broken down
1/2 lb carrots, cut into bite size pieces
1 medium onion, sliced
2 cloves garlic, minced
6 sprigs of rosemary
1 bottle red wine
1 cup chicken stock
2 tbsp olive oil
1 tbsp flour
1/2 lb mushrooms
Cook the bacon on medium in a cast iron dutch oven. Remove the bacon and leave the drippings to cook the rest. Add chicken pieces to form a single layer and brown on both sides. Set aside with the bacon and brown the rest of the chicken. Remove all the chicken. Add the onions and carrots and cook until the onions just start to brown. Add the garlic and cook for a few seconds. Start adding the wine, stock, rosemary and add back the chicken and bacon. Bring to a boil and simmer for a few minutes. Move to a 250 degree oven and allow to cook for about 40 mins. Form a roux with 1 tbsp oil and flour and add it to the chicken. Brown the mushrooms in the remaining 1 tbsp olive oil and then add to the chicken. Simmer for a few minutes.
Sunday, December 7, 2008
Garlic Shrimp Pasta
I really should cut back on my grocery shopping. My freezer is absolutely packed. First, I had a stash of all sorts of things that I felt I needed to stock my fridge: frozen peas, corn, a few bottles of water, vodka, frozen shrimp, a frozen pizza, a few ice packs, assorted nuts and so on. Then there was batches of assorted things that I just had too much of: pasta I'd made, an angel food cake because I had egg whites left from all the cinnamon buns, a bunch of bagels, some of the leftover risotto cakes I'd made a while ago. And then there was all the stuff left from thanksgiving, a shelf full of stuff my parents brought, turkey stock, turkey soup left from the turkey pot pies.
So it was time to start using up stuff that was there. This time I decided to use up some shrimp and pasta from the freezer. I made something between a shrimp scampi and an alfredo sauce. Came out pretty good and it was really easy to make and only took a couple minutes. I made enough for 2 meals, one for dinner and one to take to work for lunch sometime during the week.
Garlic Shrimp Pasta
Shrimp (enough for 1 layer across the bottom of the pan)
Butter (about 1 tbsp)
Olive Oil (about 1 tbsp)
Garlic (2 cloves), finely minced
Fresh Pasta (1/3 lb)
Flour (about 1 tbsp)
Salt
Pepper
Splash of milk
A squeeze of lemon juice
Thaw the shrimp, peel and devein as needed. Sprinkle with flour, salt and pepper and toss to coat. Set a pan on medium low and add the butter and oil. Add the garlic and shrimp, laying it out so the shrimp forms a single layer. Cook for about 1 min until the underside is pink and flip shrimp over. Add milk and heat up to a simmer.
Meanwhile, boil the pasta. It should only take a minute or so to cook fresh pasta. Add it to the shrimp and toss. Squeeze lemon juice on top.
Thursday, December 4, 2008
Turkey Pot Pie
So at the end of the weekend my fridge was packed. The trouble being, there wasn't a whole lot that lent itself well to being pawned off on people at work. There was about 1/4 of a pie, 1/3 of a cake, a few slices of banana bread, assorted things my parents brought and so on and so forth. Enough stuff you couldn't fit another bottle of water in there, let along anything else.
So I've been conscientiously trying to eat what I had rather than cooking or baking more stuff. I ate thanksgiving leftovers meals several times. But that got old. And I've had dessert with every meal which is kinda nice but also kinda weird. And I still have lots left.
So I decided to make Turkey Pot Pie. I used up what was left of my roasted onions, smashed potatoes, the carrots that weren't looking their best in my produce drawer, some of the celery, a quart of turkey stock, the maybe cup or so of chicken stock that was left in the box .... and just about everything else that was left from Thanksgiving dinner. This worked quite well as a cleaning out the fridge meal.
So I sweated the carrots and celery first. The onions were already softened so I figured I would hold off on those. I added a couple tablespoons of flour when the carrots and celery were softened a bit to form a roux. Then I dumped in a whole bunch of containers from the fridge... some listed above and some that I've probably forgotten. Milk. Milk was another thing I had added. Mixed it all up, brought it up to a simmer and let it cook for a bit. A bit meaning when I realized I was hungry and didn't want to wait any more.
Then I filled a bowl up (I don't have any fancy ramekins or anything so I just used a ceramic bowl) and stretched puff pastry over the top. The first one I did didn't work out so well. I didn't get the puff pastry stuck on the bowl enough so it ended up falling in and getting all soggy. It was OK but not quite right. The next one I pulled the puff pastry tighter and made sure it stuck to the bowl just about the whole way around. Bake until golden brown. I just turned the oven on, didn't worry about the temperature too much.
It came out quite good considering it was just me dumping all the scraps from my fridge into a pan, putting puff pastry on top and calling it a pot pie. It was nice and warm and filling, warmed me up nicely from the lack of heat in my house. Warm enough that I could feel my fingers again after chopping vegetables straight from the fridge and puttering around in my unheated house trying to figure out why it was unheated. I could have taken a pic but... well... cold and hunger won.
So what's left: 1 serving of turkey pot pie, cranberry sauce, a little bit of whipped sweet potatoes, some rolls, bits of cakes and pies and other sweets, still some turkey, mac and cheese... when I started this list I was trying to show how much progress I had made and how there really wasn't much left. Now that I am writing it out it doesn't seem so impressive.
Tuesday, December 2, 2008
German Brotchen
I was left with plenty of stuff from Thanksgiving. One of the main uses of leftovers is sandwiches. The trouble with that being I didn't have any bread.
Many years ago I had spent a few weeks in Germany. One of the things I remember was the bread. They had these rolls that were hard on the outside and soft and pillowy on the inside. This was my attempt at making those rolls. The texture was good. The outside had that nice hard crust; the inside was soft, like Wonder Bread soft. But the flavor was... so-so. I think next time I will need to try a different flour. Maybe I'll add a little sugar or honey or something next time as well.
Here's the dough rising

Here's the outside of the roll, nice and crusty though I probably should have punched it down more and gotten rid of the big air pockets
 And here is the inside of the bread. Mmmm it needed a nice sharp serrated knife to cut it in half. I didn't quite capture the steam still coming out of it.

1 package active dry yeast
1-1/4 cup slightly warm water
2 tbsp shortening
1/2 tsp salt
2 egg whites
4 cups flour
Mix the yeast and water and allow to sit for about 5 mins so that it gets frothy. Add the shortening, and salt. Add about 2 cups of flour. Beat 1 egg white to stiff peaks and fold into the mix. Add flour, about 1/4 cup at a time, until it pulls together as a wet dough but does not pull away completely from the sides of the bowl. Oil a medium bowl and put dough in the bowl to rise until doubled in size, about 1 hour. Punch down and allow to rise again. Flour a work surface and dump the dough out. Split into 12 rolls and form balls. Line a baking pan with parchment paper and spray with nonstick cooking spray. Lay the balls on the parchment paper. Make sure the balls are well spaced as they will expand. Cover with a damp towel and allow to rise, about 45 mins. Brush with the additional egg white. Heat up oven to 450F. Put some sort of pan on the rack close to the bottom of the oven. Put ice water in the pan. Put the rolls on a rack in the middle of the oven. Bake for 20 mins.
Many years ago I had spent a few weeks in Germany. One of the things I remember was the bread. They had these rolls that were hard on the outside and soft and pillowy on the inside. This was my attempt at making those rolls. The texture was good. The outside had that nice hard crust; the inside was soft, like Wonder Bread soft. But the flavor was... so-so. I think next time I will need to try a different flour. Maybe I'll add a little sugar or honey or something next time as well.
Here's the dough rising

Here's the outside of the roll, nice and crusty though I probably should have punched it down more and gotten rid of the big air pockets
 And here is the inside of the bread. Mmmm it needed a nice sharp serrated knife to cut it in half. I didn't quite capture the steam still coming out of it.
1 package active dry yeast
1-1/4 cup slightly warm water
2 tbsp shortening
1/2 tsp salt
2 egg whites
4 cups flour
Mix the yeast and water and allow to sit for about 5 mins so that it gets frothy. Add the shortening, and salt. Add about 2 cups of flour. Beat 1 egg white to stiff peaks and fold into the mix. Add flour, about 1/4 cup at a time, until it pulls together as a wet dough but does not pull away completely from the sides of the bowl. Oil a medium bowl and put dough in the bowl to rise until doubled in size, about 1 hour. Punch down and allow to rise again. Flour a work surface and dump the dough out. Split into 12 rolls and form balls. Line a baking pan with parchment paper and spray with nonstick cooking spray. Lay the balls on the parchment paper. Make sure the balls are well spaced as they will expand. Cover with a damp towel and allow to rise, about 45 mins. Brush with the additional egg white. Heat up oven to 450F. Put some sort of pan on the rack close to the bottom of the oven. Put ice water in the pan. Put the rolls on a rack in the middle of the oven. Bake for 20 mins.
Sunday, November 30, 2008
Daring Bakers: Caramel Cake with Caramelized Butter Frosting
So I'm slightly late. Only a few hours. Call it fashionably late. And I had good reason. My parents just left and I didn't have a whole lot of baking time when they were here. Thanksgiving was enough cooking for me. I'll probably post more about that later.
Reason #2 is because today is my birthday. Birthday's are supposed to have cake. Thanksgiving has turkey; 4th of July has burgers; birthday's have cake. Some things just go together. So I figured I'd make this cake for my birthday. I know, kinda sad to be making your own cake for your own birthday and eating it at home by yourself but oh well. I still want cake. People just for the sake of saying you are not alone, not so much.
Now I was a little worried because I read about some of the failures other people had and having to remake stuff to make it work and all. But I devoutly stuck with making it on my birthday. Besides, I didn't have anything else planned and that and cleaning up the mess my parents left and making some bread to make sandwiches with the leftovers would fill my day.
Anyway, off I went to make the cake. This month's challenge, in case you didn't read the title for some reason, is Caramel Cake with Caramelized Butter Frosting. The recipe was written by Shuna Fish Lydon of Eggbeater who I guess has some fancy pants bakery in the Bay Area that I'll probably never get to actually try, which is also kinda sad but besides the point. It is was chosen by Dolores, Alex, Jenny, and Natalie though you should really go do the Daring Bakers Blogroll if you want to see more. Hopefully I'll still get counted; they said you had to have links and stuff in your post but they never said they were gonna check the date although the date is obviously important.
This recipe was clearly written for me because it said to start by having a bowl of ice water ready in case you burn yourself. I followed this step. Woohoo! Look, I actually followed part of the recipe! This is good for me. And I didn't even need it. I used the bowl of ice water to cool down the syrup so I could get going on the rest of the cake even though I was waiting on everything to come to room temperature but I was impatient. I wouldn't recommend doing that because it got too cold and then I had to warm it back up to room temp while whipping it up.
It didn't take anywhere near as long as I thought it would. It took me 4 hours to do everything, which included letting things cool and making bread (that'll maybe be a separate post depending on how it comes out). So this worked out really well for me.
I'm not posting the recipe. If you go to pretty much any of the links at the top of the post you can get the recipe. I actually followed it pretty well this time.
Here's the start of the Caramel Syrup.

Here it is cooling. Nice and golden brown. It looks darker in real life. Like a Grade B maple syrup. And thick like Aunt Jemima's syrup, not maple syrup. It's got a dark really caramelly flavor; dark is the best way I can describe it. I still have about a cup worth of it left. Any thoughts on what I should do with it?

Here is the cake, done baking before icing. The texture was nice and delicate. I lined the pan with parchment paper before baking. I find that's the best way to get it out of the pan. No matter how much I try to butter and flour or cooking spray or anything else it newe seems to work quite right. Parchment me-proofs it.
The flavor is quite sweet. Which will be interesting with the super sweet frosting.

This is the finished cake. This is actually pretty for me. I know, not pretty for Daring Bakers' standards but pretty for me.

Friday, November 28, 2008
Barefoot Bloggers: Herb Roasted Onions
My parents came to my house for thanksgiving. Among a few other traditional Thanksgiving items, I made the Herb Roasted Onions that everyone else posted a few weeks ago. So I'm a little slow. At least I made them.
This actually worked out well because my Thanksgiving menu was a bit heavy on the protein and starch and this allowed me to attempt to call it a somewhat balanced meal. I tried to get brussel sprouts on Wednesday but when I went to the grocery store they didn't have any; no fresh ones and not even frozen ones! I was at a bit of a loss because I really didn't have a whole lot to my menu besides turkey and starch.
Fortunately I thought of this recipe. I bought a probe thermometer just for the turkey though I know it'll prove useful for other things as well but it didn't work out. It said the turkey was done about an hour into cooking. So then I was left to guess when the turkey would finish and therefore when to start prepping everything else. About an hour and a half into the turkey I was getting bored and decided to start prepping the sides. These took all of about 2 minutes to mix together the dressing and prep the onions. While good in general for a food prep thing, it didn't keep me busy long enough. Everything was ready to go so at 2.5 hours I decided the turkey should be done.
The onions went in the oven when the turkey came out, along with a batch of Crash Potatoes and a tray of Mac 'n cheese. I trimmed the stems back enough so that by the time they were done, pretty much all of the onion pieces separated. Which is a good thing. No one wants a big clump of onion.
These came out pretty good, though not extremely exciting. I had a number of other somewhat sweet sides so the sweetness of the onions may not have shined the way they would have if I'd had it with just a steak or piece of chicken or something.
There was too much going on that I didn't take a picture of them. They weren't very pretty anyway. My food tends not to be pretty so sometimes I wonder why I even bother posting a pic but they were good and now they are gone. Maybe I'll make them again sometime and take a pic then.
Thursday, November 27, 2008
Barefoot Bloggers: Mexican Chicken Soup
I know it's Thanksgiving so I should have a Thanksgiving post. Instead I am posting this Barefoot Bloggers soup that I made a few weeks ago.
So the other weekend I ended up getting sick. Of course it was the first time I had plans for the weekend since I had moved into my house so naturally I ended up sick. So the weekend that was supposed to be about relaxing and having fun was not as fun as I hoped. I guess I ended up running a fever at some point. And our ambitious plans to go out and do stuff resulted in us renting a couple movies and me falling asleep and being feverish.
I had the recipe for this Mexican Chicken soup printed from when it was chosen for Barefoot Bloggers and I determined this would be a good time to make it. A nice hot bowl of chicken soup is supposed to fix everything so I had at it.
I used 2 boneless skinless breasts because I had those in the freezer. And I used a small can of fire roasted tomatoes rather than the large can of whole crushed tomatoes. And I used a pot that was clearly too small for this soup. Other than that I stuck with the recipe. This is actually pretty good for me. Oh and I wasn't great about watching the time so I'm not sure how I did with timing relative to the recipe but it came out decent.
Now I had some concerns with this recipe. I don't like tomato soup. And I not real big on spicy food. And I've never really made soup that came out good before. So I wasn't extremely optimistic about how this would come out. I had a can of Progresso in the pantry in case this didn't work out so well.
Well I have to say I am quite happy with this soup. It came out hearty but not overly rich; flavorful but not over spiced (also, I didn't add all the salt that it called for, I don't seem to like a lot of salt and therefore often under season my food) and it was just very satisfying.
And it helped open up my sinuses a bit.
I had a couple bowls and then 4 quart containers. I froze 2 for future needs and left 2 for lunches for the week.
You can go to the links above if you want to see the recipe.
Tuesday, November 25, 2008
Banana Bread
I've been needing to make some of my classics. This week I made my Banana Bread. This is another one of my basic recipes that I usually make every couple weeks or so. I didn't take this loaf to work because I figured I wanted to have something around for breakfast when my parents were here.
I started with this recipe on All Recipes. It's a good classic though I've made my few modifications like always. And I don't always have the same modifications. Depends on my mood and what's around the kitchen. Most of the times I do butter, not applesauce. Sometimes I add cinnamon and/or nutmeg. Sometimes walnuts, chocolate, other nuts or anything else I find around the house. Anyway, this recipe has always been good to me.
Banana Bread
1/2 cup applesauce
3/4 cup brown sugar
2 large eggs
1 tsp vanilla
3 bananas, mashed
2 cups flour
1 tsp baking soda
1 tsp salt
1 tsp cinnamon
1/2 cup walnuts
Preheat the oven to 350. Mix the applesauce and brown sugar in a medium bowl. Mix in the vanilla and eggs, one at a time. Mix in the bananas. Mix together the flour, baking soda, salt and cinnamon. Mix it into the wet mix, just to moisten. Mix in the walnuts. Line a loaf pan with parchment paper and pour in the batter. Bake for 1 hour or until a toothpick comes out clean. Allow to cool a bit before eating.
Sunday, November 23, 2008
Barefoot Bloggers BRC: Chocolate Orange Cake
J visited this weekend. We spent most of the weekend just hanging out and watching Gossip Girl. I am totally taking up their thing of just using the first letter of their name. It was one of those sick pleasures. Who needs to get dressed or leave the house. After she left I figured I should probably make some food for the next few days.
I attempted to make the Chocolate Orange Cake that was chosen this month as one of the Bonus Recipe Challenges. I know, I'm a few days late but that seems to be the trend with me. Now, I didn't have any small molds so I decided to make it in a 9" square pan and cut it up.
I used tangerine instead of orange since that's what I had. And I used applesauce instead of butter because I decided to pretend I was making something healthy. Overall it came out OK except that I undercooked it a bit and the piece that was in the middle wasn't all the way cooked but that became my chef's snack. The chocolate pieces also seemed to settle to the bottom of the cake but that's OK. I may retry this recipe again at some point.

Thursday, November 20, 2008
Barefoot Bloggers BRC: Chive Risotto Cakes
This month there were 2 recipes chosen for the BRC (bonus recipe challenge). I got to this one, hopefully I will get to the other one at some point.
This was an interesting recipe because it is a way to make risotto cakes without having leftover risotto. You make fake risotto with yogurt and eggs instead of the starchy goodness to bind it together and then bread and fry.
I can't say this recipe worked for me very well. I made them one morning when I woke up starving at 4AM. Sadly this has happened more than once. The waking up at 4AM, not the making risotto cakes. Maybe because I have a tendency of falling asleep at 7 or so when I get home.
The upside was that I didn't cut myself. The downside is the risotto cakes really didn't come out well and I burned myself. They were salty (which was my error because I oversalted the rice) but bland (which might also be my fault because I used 2 green onions, which was all I had, instead of 3 tablespoons of minced chives. I had issues getting it to form a nice ball (which might also be my fault because I used regular plain yogurt rather than greek yogurt and I didn't strain the rice because it looked pretty dry). So the gist of it is, it came out pretty bad (although barely edible, which is better than inedible) and I don't care enough to try again to try and make it right.
And here is the chronological version that might make a bit more sense. I woke up at 4AM hungry and realizing I needed food for the next day for lunch. So I decided I was going to make these risotto cakes. So I head downstairs and start cooking. I got a pot of water and the stove and salted it like you salt the water for pasta. That was mistake #1. I figured it needed to be salted because that's what the recipe said but I figured the amount of salt was not really intended to be measured, like with pasta.
So then I let it cook and started to prep the other stuff. I had plain yogurt in the fridge so that is what I decided to use rather than greek yogurt. I also didn't measure it, figuring I'd just eyeball a half a cup. Mistake #2.
I only had the 2 green onions so that's what I used. I figured it wasn't really intended to have a real strong oniony flavor so it would be OK. It was probably about 2 tbsps of green onion so I figured I would be close enough. Mistake #3.
So then the rice had cooked for about 20 mins, like the recipe said and there was almost no water left in the rice so I figured I would just add it as is. I figured the little bit of water would be irrelevant because if I rinsed it there would just be more water and the starch that was left in the water would help pull it together anyway. Mistake #4.
So I mixed the rice in and tried to form a ball but it was much too liquidy and soft it wouldn't hold together. I tried dropping a spoonful into the breadcrumbs and then tossing it around. That didn't work. In this process I got it on my hands so I gave it a little taste. All I could taste was overwhelming amounts of salt.
At this point the goal was just to make something edible, I didn't really care if it was good any more. Good clearly was not going to happen. I decided the only way to dilute the salt is to make another cup of rice without salt and mix it in. This time I drained and rinsed the rice too. This got the salt content down and thickened up the mix a bit but it was still not holding a ball very well. I managed to fry up a couple so I could have something for lunch. They were edible. That's about the best I can say for them.
I mixed in some italian seasoned breadcrumbs to help bind it and give it some flavor. I stuck the mix in the fridge so that the cold would help firm it up and I could give it another shot when I got home. When I got home I fried up the rest. They were a little better though definitely still not good. I have some in the freezer that I guess I will use like a tater tot type replacement if I am craving fried starchiness and also because I can't really handle any more of them right now. This was a failed mission. This is the first Barefoot Contessa recipe that I have tried that I wasn't happy with. How sad. Next time I'll just make risotto.
Wednesday, November 19, 2008
Pumpkin Pie
I haven't made a pie in ages. Since Pi Approximation Day probably. And those weren't really pies anyway. But I keep seeing stuff about pies.... all sorts of pies.... apple pies, pie crust competitions, and then I saw this post and I knew I had to make it. It looked so good (and the instructions were simple and I had all the ingredients so no subs) that I actually followed it!
I bought the pie crust because this was an impulse thing because I hadn't baked anything in about 5 days and making crust would have taken too long. My strainer clearly wasn't that fine mesh because I didn't have too much trouble straining it. I don't actually know how much ginger I used because I just took the knob out of the freezer and grated some into the pan until it looked good. The filling made 2 pies... the recipe only states 1 but after I made the filling it definitely was not fitting in 1 shell and it filled 2 pretty well.
The pie came out really good and silky smooth. It was mildly spiced, lots of good pumpkiny flavor and not overly creamy although my judgement on this was probably not the best because I was still recovering from a cold and my smell and taste were off. I brought them to work and they went quickly, but everything seems to go quickly at work so far so that doesn't really tell you anything. It was definitely better than the pumpkin pie I had made for Pi Day. Maybe I will make it again for the next Pi Day... if I decide to do it, which is still to be determined.
Since I took the pies to work, I don't have any pics of it sliced but it was very smooth. It kind of looked like it wasn't cooked all the way through at the center before I cut into it but it was set up when I sliced it.

Sunday, November 16, 2008
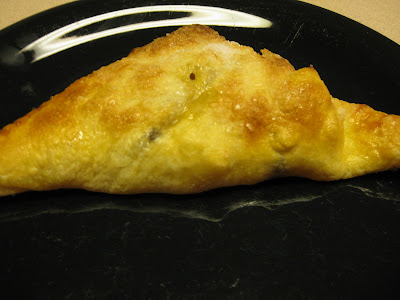
Barefoot Bloggers Catch Up: Apple Turnovers
So I've started trying to catch up on all the food blogging that I didn't do while I was moving. I have about 30 recipes stuck on my refrigerator plus more that I haven't gotten around to printing yet. I am not sure I will ever catch up... I see so many recipes that I want and then I never seem to get a chance to make all of them. Not to mention, I never seem to be able to follow a recipe and I end up screwing them up half the time so then I either have to retry it or call it a flop.
Anyway, I decided to do one of the Barefoot Blogger recipes. Apples are still in peak season so I made Apple Turnovers. It's a real simple recipe, though I still failed to follow it. It called for dried cherries but I had raisins; it called for orange juice and zest but I had lemons; it called for 3 apples but I bought 4 because I couldn't remember what I needed so I bought 4 figuring that would be plenty. I ended up needing to roll the puff pastry out thinner to make it big enough for all the filling and I got tired of waiting for it to thaw because i didn't think to put it in the fridge or take it out to thaw until i wanted to roll it.
While my pastries weren't perfect, they still tasted good. They were pretty good fresh but they kinda lost that crispy goodness once they got cold.

Friday, November 7, 2008
A quick dinner of Baby Bok Choy and Ramen
One of the exciting things about moving here is there is an Asian grocery store about a block from my house. I went there last week. The only problem was I didn't really know what I had at home and what I wanted to make. I was driving by it so I decided to stop. I bought some baby bok choy and a couple sauces.
Well the other day I came home and was dead tired and starving. Tired won so I went to bed. I woke up at 1AM starving. I was half asleep and I saw the bok choy in the fridge. I took it out and put it on a cutting board so I could open up the bunches. Well in my half asleep stupor, I was holding the bok choy in my right hand and cut it with my left. That's when I realized the knife was on my finger, not the bok choy.
After I cleaned up my wonderfully cut finger I went back to my quest for food. At first was just going to cook up some of it. Then I figured that would not fill me so I'd end up making something else. I made some ramen and combined the two. Woohoo. A cheap relatively tasty and maybe not too bad (it's got a vegetable, it's not all carbs!) for you meal. And it took less than 10 mins to make!
Bok Choy and Ramen
4 heads of baby bok choy, chopped to remove the stem holding them together
1 tbsp soy sauce
1 tbsp oyster sauce
1 tsp rice wine vinegar
a splash sesame oil
1 pack chicken flavored ramen (preferably with the seasoning packet and the oil packet)
Heat the baby bok choy in a sauce pan on medium.
Add a little water to help the bok choy wilt down.
Add the soy sauce, oyster sauce, vinegar and oil.
Cook about 2 mins.
Add enough water so that it is deep enough to cook the ramen and bring to a boil.
Add the seasoning packets.
Add the ramen noodles.
Cook just until ramen noodles are done.
Eat.

Monday, November 3, 2008
Barefoot Bloggers Catch up: Butternut Squash Risotto
I did another catch up recipe from the Barefoot Bloggers. This time I did the Butternut Squash Risotto. It's the perfect season for butternut squash now so I picked one up.
This year was the first time I've ever cooked butternut squash. Sad, I know. I never really ate any gourds growing up and well... I've had it now. It's quite tasty. Earthy and mildly sweet. Quite a bit like sweet potatoes.
As usual, I followed the recipe somewhat loosely. I don't seem to be capable of following a recipe as it is written. Even when I intend to follow a recipe exactly as it's written something inevitably happens. Maybe I need to seek help in this matter.
Anyway, I made approximately 1/3 of the recipe.... I would have been eating risotto for the next 6 months if I made the whole thing. And I pureed the butternut squash before adding it (though not all that well). And I didn't have any wine so I just used a bit more chicken stock. And I didn't have any shallots, pancetta or saffron so I just used onions. Below is my recipe.
I had it with soy balsamic glazed chicken thighs. I know, they don't really go together but you should be used to that by now.

Butternut Squash Risotto
- 1/2 butternut squash
- 2 tablespoons olive oil
- Kosher salt and freshly ground black pepper
- 2.5 cups chicken stock, preferably homemade
- 2 tablespoons unsalted butter

- 1/4 large onion, finely chopped
- 1/2 cup rice
- freshly grated Parmesan
Preheat the oven to 400 degrees F.
Peel the butternut squash, remove the seeds, and cut it into 3/4-inch cubes. Place the squash on a sheet pan and toss it with the olive oil, 1 teaspoon salt, and 1/2 teaspoon pepper. Roast for 25 to 30 minutes, tossing once, until very tender. Puree in food processor.
In a pot melt the butter and saute the onions on medium-low heat for 10 minutes, until translucent but not browned. Add the rice and stir to coat the grains with butter. Add about 1/2 cup stock, salt and pepper and cook for 2 minutes, stirring occasionally. Each time, cook until the mixture seems a little dry, then add more stock. Continue until the rice is cooked through, but still al dente, about 30 minutes total. Add the roasted squash puree and Parmesan. Mix well and serve.
Saturday, November 1, 2008
Barefoot Bloggers Catch up: Mac 'n Cheese
Yesterday was a lazy day. I woke up about 8 but just puttered around the house a little and watched TV in bed for most of the day. I just couldn't seem to get going. It didn't help that I didn't really have anything planned for the day. Finally at about 3PM I decided to get up and shower and find something to do.
I'm starting to make the recipes that I want to catch up on for Daring Bakers and Barefoot Bloggers. I decided to do the Grown Up Mac 'n Cheese tonight. If you want to make it for real you should use the link and follow the real recipe. I interpreted it pretty loosely. But it came out good so mine is below. It's quite rich and really creamy.


As a tribute to Pottsville (or maybe Catholics or where ever it stems from) I had it with fish sticks. No stewed tomatoes though. THose are just ick.
- 4 ounces thick-sliced bacon
- Kosher salt
- 2 cups elbow macaroni or cavatappi
- 1 1/2 cups milk
- 2 tablespoons all-purpose flour
- 4 ounces Asiago cheese, grated
- 3 ounces extra-sharp Cheddar, grated
- 2 ounces Gorgonzola
- 1/4 teaspoon freshly ground black pepper
- Pinch nutmeg
- A dash of Frank's Red Hot
- A sprinkling of dried parsley and basil
- 1 cup of frozen peas
- Panko bread crumbs
Preheat the oven to 400 degrees F.
Cook the bacon in a large pan. Transfer the bacon to a plate lined with paper towels and crumble when it is cool enough to handle. Leave the drippings in the pan. Add flour to the drippings and mix well to incorporate. Add the milk to the pan and bring up to a boil, mixing well to incorporate until thick and smooth.
Off the heat, add the everything except the pasta, breadcrumbs and a small handful of cheddar cheese to the sauce.
Cook the pasta according to the directions on the package. Drain well. Add the cooked pasta, peas and crumbled bacon to the sauce and stir well. Pour into a large baking dish.
Sprinkle breadcrumbs and any leftover cheese over the pasta. Bake for 35 to 40 minutes, or until the sauce is bubbly and the macaroni is browned on the top. Allow to cool for a few minutes before eating if you don't want to burn yourself.
Cinnamon Bun Trauma
I have made cinnamon buns many times. I started with Alton Brow's recipe, practiced a whole bunch, made my own little tweaks on it and ultimately had my cinnamon bun recipe. I've made it probably 20 times or so with very consistent results.
After I got settled in a little, I made my pasta and stuff, which was really successful. My kitchen layout is wonderful. I have so much more working space and it's all right by the stove so it works really well. I was giddy with the prospects of everything I was going to make and how tasty it was going to be.
I figured I'd make my tried and true cinnamon buns so that I could bring them to work and get my boss off my case for not having any baked goods that day. I had made a pot of oatmeal over the weekend as well so I had that for breakfast and I brought the tray in without trying them first figuring they would be good like they always are.
I brought them to our Monday morning meeting and dished them out. Other people started trying them first while I was scooping them out but I assured them they would be good because I'd made them so many times. After I got a bunch out I grabbed one to have myself even though I wasn't really hungry I figured I needed to have one before they were gone.
Well this was rather traumatic. It was hard and tough and all sorts of not good. The flavor was good but the texture was all wrong. It was supposed to be gooey and soft and all sorts of wonderfulness that is cinnamon buns. It was all sorts of wrong.
That night I came home and started another batch. I baked them Wednesday night even though I had some sort of nasty stomach unhappiness. Unhappiness that kept me from tasting them that night. They came out slightly better but still not quite right.
So I will do another batch this weekend and see how it goes. This needs to be resolved.
Thursday, October 30, 2008
My New House
Here are some real pics of my house using my new camera. I finally found my card reader so I could post these.
These are of the house empty. Let's start at the entry again. Here are the stairs up to the bedrooms and office.

To the left, the living room with the daybed I inherited because they couldn't get it out.

 And through the living room to the dining room/kitchen.


And over to the sunroom
 Now let's head up. Here's the guest bath.
 And the guest bedroom
 My office. Which by the way isn't in the hvac so we'll see how much use it really gets besides as a place to store stuff.
 My master bath

 The hall between the bath and my bedroom with the monstrous closets.

And my bedroom

And this was after my stuff was delivered. I had an unpacking service so I had them take care of some items, though not everything. The unpacking is really nice because they take away the boxes and paper. If they hadn't I would have filled our dumpster many times over.


 This is my pathetic wardrobe. I had them unpack my clothes and this is what it filled. This is just the walk in closet. There is another side of the closet on the right as well that I couldnt' get in the picture. There is a 2nd closet as well.
 Fortunately I had my suitcase of clothes that I had brought down with me that when I spread it out and put all my coats and hung up all my jackets, sweatshirts, fleeces, etc and moved everything from my dressers to my closet made it look like I could almost make good use of it.
These are of the house empty. Let's start at the entry again. Here are the stairs up to the bedrooms and office.

To the left, the living room with the daybed I inherited because they couldn't get it out.

 And through the living room to the dining room/kitchen.

And over to the sunroom
 Now let's head up. Here's the guest bath.
 And the guest bedroom
 My office. Which by the way isn't in the hvac so we'll see how much use it really gets besides as a place to store stuff.
 My master bath
 The hall between the bath and my bedroom with the monstrous closets.
And my bedroom

And this was after my stuff was delivered. I had an unpacking service so I had them take care of some items, though not everything. The unpacking is really nice because they take away the boxes and paper. If they hadn't I would have filled our dumpster many times over.


 This is my pathetic wardrobe. I had them unpack my clothes and this is what it filled. This is just the walk in closet. There is another side of the closet on the right as well that I couldnt' get in the picture. There is a 2nd closet as well.
  Fortunately I had my suitcase of clothes that I had brought down with me that when I spread it out and put all my coats and hung up all my jackets, sweatshirts, fleeces, etc and moved everything from my dressers to my closet made it look like I could almost make good use of it.
Wednesday, October 29, 2008
DB: Pizza.... I'm Back!!!!!!
This month's Daring Baker's challenge was chosen by Rosa. She's got some cool pics and recipes on her blog though it's not all in English. This is problematic. It looks like maybe French? I don't know french! And everyone knows the world revolves around me!
Well at least she chose an interesting recipe. I once had a bad attempt at Deep Dish Pizza before. It came out dry and grainy and all sorts of bleh. That was the only attempt at pizza dough that I had made before so I was not overly optimistic.
The dough came together quite easily. I did it all in my stand mixer so it was even easier. I must have not worked in enough flour in the kneading process because there was no tossing action to be seen. I picked up the dough balls and they pretty much started stretching instantly. They stretched out so quick I just rushed to get something under it so I didn't just drop it.
The first 2 I tried the cornmeal, skooch off a baking pan idea. That failed miserably. I guess I didn't cornmeal evenly enough and it stuck to the pan. I ended up using a spatula to push it off onto my griddle pan that was hot in the oven and it made a mess.
Well I baked it anyway. It didn't come out too bad, considering... the part that I pushed off that flipped over ended up burning before the rest of the pizza was done. It tasted OK after I cut the burnt part off. The crust came out nice and crispy.
 Look at that crisp crust... fresh out of the oven and me burning myself only a little

The next one I tried was a dessert pizza. I put some frozen mixed berries, chocolate and walnuts. This time I put the pan that I assembled it on into the oven. This didn't get the nice crisp crust I guess because the pan had to warm up. I also didn't chop up the chocolate small enough I guess and it didn't melt very well. While it tasted OK, the crust was lacking and it was rather mediocre.
After that I made the last 4 so I would have food for a couple days. I did a BBQ chicken with onions and gouda, 2 with the meatsauce that I had from last week and mozzerella and an another attempt at a dessert pizza. They came out decent when they were fresh but once I stuck them in the fridge and had them for lunch they were edible but not really good. Sigh.
Here are pics of round 2:
 The BBQ Chicken pizza with gouda cheese and onion:
Pizza with meat sauce and italian blend of cheeses:
Pizza with meat sauce and fresh mozzerella:

And dessert.... cream cheese base with strawberries and walnuts on top.
I was starving by the time they got in the oven so there are no pics of them cooked.
~ BASIC PIZZA DOUGH ~
Original recipe taken from “The Bread Baker’s Apprentice” by Peter Reinhart.
Makes 6 pizza crusts (about 9-12 inches/23-30 cm in diameter).
Ingredients:
4 1/2 Cups (20 1/4 ounces/607.5 g) Unbleached high-gluten (%14) bread flour or all purpose flour, chilled
1 3/4 Tsp Salt
1 Tsp Instant yeast
1/4 Cup (2 ounces/60g) vegetable oil
1 3/4 Cups (14 ounces/420g or 420ml) Water, ice cold (40° F/4.5° C)
1 Tb sugar
Semolina/durum flour or cornmeal for dusting
DAY ONE
Method:
1. Mix together the flour, salt and instant yeast in a big bowl (or in the bowl of your stand mixer).
2. Add the oil, sugar and cold water and mix well (with the help of a large wooden spoon or with the paddle attachment, on low speed) in order to form a sticky ball of dough. On a clean surface, knead for about 5-7 minutes, until the dough is smooth and the ingredients are homogeneously distributed. If it is too wet, add a little flour (not too much, though) and if it is too dry add 1 or 2 teaspoons extra water.
NOTE: If you are using an electric mixer, switch to the dough hook and mix on medium speed for the same amount of time.The dough should clear the sides of the bowl but stick to the bottom of the bowl. If the dough is too wet, sprinkle in a little more flour, so that it clears the sides. If, on the contrary, it clears the bottom of the bowl, dribble in a teaspoon or two of cold water.
The finished dough should be springy, elastic, and sticky, not just tacky, and register 50°-55° F/10°-13° C.
3. Flour a work surface or counter. Line a jelly pan with baking paper/parchment. Lightly oil the paper.
4. With the help of a metal or plastic dough scraper, cut the dough into 6 equal pieces (or larger if you want to make larger pizzas).
NOTE: To avoid the dough from sticking to the scraper, dip the scraper into water between cuts.
5. Sprinkle some flour over the dough. Make sure your hands are dry and then flour them. Gently round each piece into a ball.
NOTE: If the dough sticks to your hands, then dip your hands into the flour again.
6. Transfer the dough balls to the lined jelly pan and mist them generously with spray oil. Slip the pan into plastic bag or enclose in plastic food wrap.
7. Put the pan into the refrigerator and let the dough rest overnight or for up to thee days.
NOTE: You can store the dough balls in a zippered freezer bag if you want to save some of the dough for any future baking. In that case, pour some oil(a few tablespooons only) in a medium bowl and dip each dough ball into the oil, so that it is completely covered in oil. Then put each ball into a separate bag. Store the bags in the freezer for no longer than 3 months. The day before you plan to make pizza, remember to transfer the dough balls from the freezer to the refrigerator.
DAY TWO
8. On the day you plan to eat pizza, exactly 2 hours before you make it, remove the desired number of dough balls from the refrigerator. Dust the counter with flour and spray lightly with oil. Place the dough balls on a floured surface and sprinkle them with flour. Dust your hands with flour and delicately press the dough into disks about 1/2 inch/1.3 cm thick and 5 inches/12.7 cm in diameter. Sprinkle with flour and mist with oil. Loosely cover the dough rounds with plastic wrap and then allow to rest for 2 hours.
9. At least 45 minutes before making the pizza, place a baking stone on the lower third of the oven. Preheat the oven as hot as possible (500° F/260° C).
NOTE: If you do not have a baking stone, then use the back of a jelly pan. Do not preheat the pan.
10. Generously sprinkle the back of a jelly pan with semolina/durum flour or cornmeal. Flour your hands (palms, backs and knuckles). Take 1 piece of dough by lifting it with a pastry scraper. Lay the dough across your fists in a very delicate way and carefully stretch it by bouncing it in a circular motion on your hands, and by giving it a little stretch with each bounce. Once the dough has expanded outward, move to a full toss.
NOTE: Make only one pizza at a time.
During the tossing process, if the dough tends to stick to your hands, lay it down on the floured counter and reflour your hands, then continue the tossing and shaping.
In case you would be having trouble tossing the dough or if the dough never wants to expand and always springs back, let it rest for approximately 5-20 minutes in order for the gluten to relax fully,then try again.
You can also resort to using a rolling pin, although it isn’t as effective as the toss method.
11. When the dough has the shape you want (about 9-12 inches/23-30 cm in diameter - for a 6 ounces/180g piece of dough), place it on the back of the jelly pan, making sure there is enough semolina/durum flour or cornmeal to allow it to slide and not stick to the pan.
12. Lightly top it with sweet or savory toppings of your choice.
NOTE: Remember that the best pizzas are topped not too generously. No more than 3 or 4 toppings (including sauce and cheese) are sufficient.
13. Slide the garnished pizza onto the stone in the oven or bake directly on the jelly pan. Close the door and bake for abour 5-8 minutes.
NOTE: After 2 minutes baking, take a peek. For an even baking, rotate 180°.
If the top gets done before the bottom, you will need to move the stone or jelly pane to a lower shelf before the next round. On the contrary, if the bottom crisps before the cheese caramelizes, then you will need to raise the stone or jelly.
14. Take the pizza out of the oven and transfer it to a cutting board or your plate. In order to allow the cheese to set a little, wait 3-5 minutes before slicing or serving.
Well at least she chose an interesting recipe. I once had a bad attempt at Deep Dish Pizza before. It came out dry and grainy and all sorts of bleh. That was the only attempt at pizza dough that I had made before so I was not overly optimistic.
The dough came together quite easily. I did it all in my stand mixer so it was even easier. I must have not worked in enough flour in the kneading process because there was no tossing action to be seen. I picked up the dough balls and they pretty much started stretching instantly. They stretched out so quick I just rushed to get something under it so I didn't just drop it.
The first 2 I tried the cornmeal, skooch off a baking pan idea. That failed miserably. I guess I didn't cornmeal evenly enough and it stuck to the pan. I ended up using a spatula to push it off onto my griddle pan that was hot in the oven and it made a mess.
Well I baked it anyway. It didn't come out too bad, considering... the part that I pushed off that flipped over ended up burning before the rest of the pizza was done. It tasted OK after I cut the burnt part off. The crust came out nice and crispy.
 Look at that crisp crust... fresh out of the oven and me burning myself only a little
The next one I tried was a dessert pizza. I put some frozen mixed berries, chocolate and walnuts. This time I put the pan that I assembled it on into the oven. This didn't get the nice crisp crust I guess because the pan had to warm up. I also didn't chop up the chocolate small enough I guess and it didn't melt very well. While it tasted OK, the crust was lacking and it was rather mediocre.
After that I made the last 4 so I would have food for a couple days. I did a BBQ chicken with onions and gouda, 2 with the meatsauce that I had from last week and mozzerella and an another attempt at a dessert pizza. They came out decent when they were fresh but once I stuck them in the fridge and had them for lunch they were edible but not really good. Sigh.
Here are pics of round 2:
 The BBQ Chicken pizza with gouda cheese and onion:
Pizza with meat sauce and italian blend of cheeses:

Pizza with meat sauce and fresh mozzerella:

And dessert.... cream cheese base with strawberries and walnuts on top.

I was starving by the time they got in the oven so there are no pics of them cooked.
~ BASIC PIZZA DOUGH ~
Original recipe taken from “The Bread Baker’s Apprentice” by Peter Reinhart.
Makes 6 pizza crusts (about 9-12 inches/23-30 cm in diameter).
Ingredients:
4 1/2 Cups (20 1/4 ounces/607.5 g) Unbleached high-gluten (%14) bread flour or all purpose flour, chilled
1 3/4 Tsp Salt
1 Tsp Instant yeast
1/4 Cup (2 ounces/60g) vegetable oil
1 3/4 Cups (14 ounces/420g or 420ml) Water, ice cold (40° F/4.5° C)
1 Tb sugar
Semolina/durum flour or cornmeal for dusting
DAY ONE
Method:
1. Mix together the flour, salt and instant yeast in a big bowl (or in the bowl of your stand mixer).
2. Add the oil, sugar and cold water and mix well (with the help of a large wooden spoon or with the paddle attachment, on low speed) in order to form a sticky ball of dough. On a clean surface, knead for about 5-7 minutes, until the dough is smooth and the ingredients are homogeneously distributed. If it is too wet, add a little flour (not too much, though) and if it is too dry add 1 or 2 teaspoons extra water.
NOTE: If you are using an electric mixer, switch to the dough hook and mix on medium speed for the same amount of time.The dough should clear the sides of the bowl but stick to the bottom of the bowl. If the dough is too wet, sprinkle in a little more flour, so that it clears the sides. If, on the contrary, it clears the bottom of the bowl, dribble in a teaspoon or two of cold water.
The finished dough should be springy, elastic, and sticky, not just tacky, and register 50°-55° F/10°-13° C.
3. Flour a work surface or counter. Line a jelly pan with baking paper/parchment. Lightly oil the paper.
4. With the help of a metal or plastic dough scraper, cut the dough into 6 equal pieces (or larger if you want to make larger pizzas).
NOTE: To avoid the dough from sticking to the scraper, dip the scraper into water between cuts.
5. Sprinkle some flour over the dough. Make sure your hands are dry and then flour them. Gently round each piece into a ball.
NOTE: If the dough sticks to your hands, then dip your hands into the flour again.
6. Transfer the dough balls to the lined jelly pan and mist them generously with spray oil. Slip the pan into plastic bag or enclose in plastic food wrap.
7. Put the pan into the refrigerator and let the dough rest overnight or for up to thee days.
NOTE: You can store the dough balls in a zippered freezer bag if you want to save some of the dough for any future baking. In that case, pour some oil(a few tablespooons only) in a medium bowl and dip each dough ball into the oil, so that it is completely covered in oil. Then put each ball into a separate bag. Store the bags in the freezer for no longer than 3 months. The day before you plan to make pizza, remember to transfer the dough balls from the freezer to the refrigerator.
DAY TWO
8. On the day you plan to eat pizza, exactly 2 hours before you make it, remove the desired number of dough balls from the refrigerator. Dust the counter with flour and spray lightly with oil. Place the dough balls on a floured surface and sprinkle them with flour. Dust your hands with flour and delicately press the dough into disks about 1/2 inch/1.3 cm thick and 5 inches/12.7 cm in diameter. Sprinkle with flour and mist with oil. Loosely cover the dough rounds with plastic wrap and then allow to rest for 2 hours.
9. At least 45 minutes before making the pizza, place a baking stone on the lower third of the oven. Preheat the oven as hot as possible (500° F/260° C).
NOTE: If you do not have a baking stone, then use the back of a jelly pan. Do not preheat the pan.
10. Generously sprinkle the back of a jelly pan with semolina/durum flour or cornmeal. Flour your hands (palms, backs and knuckles). Take 1 piece of dough by lifting it with a pastry scraper. Lay the dough across your fists in a very delicate way and carefully stretch it by bouncing it in a circular motion on your hands, and by giving it a little stretch with each bounce. Once the dough has expanded outward, move to a full toss.
NOTE: Make only one pizza at a time.
During the tossing process, if the dough tends to stick to your hands, lay it down on the floured counter and reflour your hands, then continue the tossing and shaping.
In case you would be having trouble tossing the dough or if the dough never wants to expand and always springs back, let it rest for approximately 5-20 minutes in order for the gluten to relax fully,then try again.
You can also resort to using a rolling pin, although it isn’t as effective as the toss method.
11. When the dough has the shape you want (about 9-12 inches/23-30 cm in diameter - for a 6 ounces/180g piece of dough), place it on the back of the jelly pan, making sure there is enough semolina/durum flour or cornmeal to allow it to slide and not stick to the pan.
12. Lightly top it with sweet or savory toppings of your choice.
NOTE: Remember that the best pizzas are topped not too generously. No more than 3 or 4 toppings (including sauce and cheese) are sufficient.
13. Slide the garnished pizza onto the stone in the oven or bake directly on the jelly pan. Close the door and bake for abour 5-8 minutes.
NOTE: After 2 minutes baking, take a peek. For an even baking, rotate 180°.
If the top gets done before the bottom, you will need to move the stone or jelly pane to a lower shelf before the next round. On the contrary, if the bottom crisps before the cheese caramelizes, then you will need to raise the stone or jelly.
14. Take the pizza out of the oven and transfer it to a cutting board or your plate. In order to allow the cheese to set a little, wait 3-5 minutes before slicing or serving.
Sunday, October 19, 2008
DB/BB/New House and deflowering my new kitchen!
I have now closed on my house! It was a bit painful. The money transfer took all day Tuesday and then the movers showed up almost 4 hours late. But now everything is here. And a lot is unpacked.... not all... but a lot. I have pics but I can't currently find my SD Card reader.
Now I have a real kitchen! For the last week or so I've been thinking about my first real meal I was going to make in my new kitchen. I decided on Spaghetti Bolognese with freshly made spaghetti and freshly ground meat using my stand mixer and attachments that have sadly been sitting in a box for over 2 months now. They have been crying to get out of the box and make something. Maybe that's why I haven't been sleeping well. I also made fresh baked bread, based of the No Knead Bread recipe that has been all the rage for a while with some garlic butter. I threw in a salad to call it a balanced meal and attempted to make Creme Brulee for dessert.
The first time doing something doesn't always work out the way you hope it would. It can be awkward because you don't know exactly how everything should happen. I had very ambitious hopes for how it would be. Which can lead to disappoint. Well let me tell you, it was everything I hoped it would be. Although it wasn't perfect, we'll get there eventually, it was a very good and satisfying experience.
So the first thing I started was the No Knead Bread. I pretty much used this recipe, the original. Here is my version. I made the dough Friday night so that I could have it with my bread on Saturday. It came out wonderfully. It had a wonderful crisp chewy crust. I threw a head of garlic in the oven while the pan was heating and made garlic butter to spread on the bread. mmmmmmmmmm tasty
No Knead Bread
3 cups all-purpose or bread flour, more for dusting
¼ teaspoon instant yeast
1¼ teaspoons salt
1 5/8 cup water
Mix everything together in a bowl and let it rise on the counter for at least 12 hours. The dough is very wet.
Flour your countertop and hands generously and dump the dough on the counter. Work the dough into a ball. Flour a bowl generously and throw in the dough.
Allow to rise about 2 hours.
Heat up a cast iron dutch oven in the oven at 450 for at least a half an hour.
Dump the dough into the dutch oven, cover and bake for 30 mins.
Take the lid off and bake for an additional 15 mins until the bread is golden brown and crusty.
Next item was the sauce. I ground 2 lbs of chuck with my stand mixer. I learned that the piece I used last time for making the really thick spaghetti is actually for the meat grinder. Oops. It was still good. Well I learned something. I went a little heavy with the red pepper flake but it was good. It makes a lot of sauce. I froze 2 quarts of it and still had enough for a half a lb of pasta. The round quart containers like the ones from chinese takeout places fit perfectly in the door of my freezer. Woohoo I'm filling my fridge.
Bolognese Sauce
2 lbs ground chuck
8 oz mushrooms, finely chopped
1 large onion, finely chopped
1 jar tomato sauce
mozzerella cheese
parmesan cheese
sprinkles of red pepper flake, basil, oregano, parsley, garlic powder to taste
Brown the beef in a large skillet on medium high. Remove the meat and set aside.
Add the mushrooms to the pan and brown for a minute then add the onion. Cook until translucent.
Add back the meat and the tomato sauce, bring to a simmer and lower heat to medium low.
Taste and season as desired.
Add cheese.
Simmer until the pasta is ready.
The next item was the pasta. I learned something there too... the first time I made the dough I made it too wet and the noodles all stuck together. This time I made it too dry and it doesn't extrude. It's like trying to extrude plastic with the heats too low or off. I had to rip the whole thing apart, get the dough out, incorporate more water and re-extrude. But I got it. I made half of it and froze the other half.
Fresh Pasta
2 1/4 cup flour
1 large egg
water
Mix flour and egg in your stand mixer.
Add water slowly just until the dough holds together if squeezed.
Rest dough for 15 mins to let the water saturate the flour.
Extrude through your pasta maker. Re-extrude as necessary.
Add to boiling salted water until it floats.
Add to hot sauce immediately to get the sauce to integrate into the pasta.
And for dessert.... creme brule. I used something like Dorie Greenspan's recipe that people did for Tuesdays with Dorie. Of course I had my modifications. I did it in a water bath rather than low oven temp. I still tried to caramelize the sugar on top in the toaster oven, like before I moved in because I don't have a torch. It didn't work so well. I have a couple more ramekins of the custard that I will try again. I only had a couple small ramekins with me and not enough room in the fridge for the ingredients and whatnot until I got in the house.
Creme Brulee
1 1/4 cup heavy cream
1/2 cup milk
3 egg yolks
1/3 cup sugar
2 tsp vanilla extract
sugar on top to coat
Preheat oven to 350.
Heat milk and cream in a pan to a simmer.
Mix egg yolks and sugar in a medium bowl.
Stream into egg yolks while whisking to temper the eggs.
Stir in vanilla.
Pour through strainer into 4 1 cup ramekins.
Place a pan to be used as a water bath in the oven.
Place ramekins in pan and pour boiling water to create water bath.
Bake for 1 hour or until custard is firm.
Chill for at least 4 hours.
Just before eating, sprinkle sugar on top just to coat.
Use a torch or broiler to caramelize the sugar on top.
Allow to cool a couple minutes so crust forms.
Eat immediately.
Next I will try to catch up on the Daring Bakers and Barefoot Bloggers challenges I've missed for a while now. I will make as many as possible but some of them probably aren't going to happen. I have my doubts I'm going to find good enough tomatoes to make a panzanella salad. Hopefully most of the others will happen over the next couple months.
Maybe I'll get the rest of stuff put away at some point too.
Subscribe to:
Posts (Atom)

